Recently I made a
thread here asking about capture devices for streaming. Stream technology is getting better, and so are people’s computers and Internet connections, making it more and more feasible by the year for the common Joe to broadcast.
As you might imagine, most stream hardware and software is primarily for Windows, as it hasn’t had time to mature yet on OS X. Hardware for OS X is still lacking, but software not so much, so I thought I’d post a quick guide on what’s available and how to broadcast on a Mac for those looking for a simple, yet powerful solution. The software to get:
Free
CamTwist:

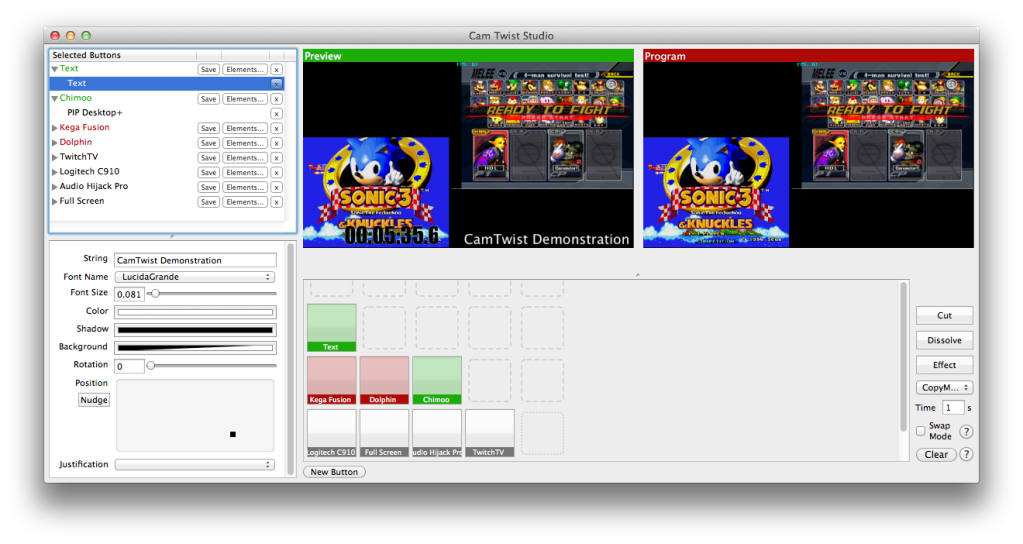
Professional video studio software. This application lets you capture, combine, and manipulate multiple video sources. There’s a huge variety of special effects that can enhance the video, and you can add text/graphic overlays, background, and even enter IRC servers and display IRC channel conversations. As shown in the image, two emulators are being displayed in the same screen. I can change their size/position freely, add a camera if I wanted to show myself playing, you can even restream someone else’s stream when you’re doing live competitions. Note: It cannot record or stream anything on its own, you must combine it with other software!
How to use: When you load CamTwist, press ⌘S to open up the studio window. Click on “New Button” and the list on the top left will say “Untitled.” To its right, click “Elements” and you can choose a video source and effects you want. Webcam and Desktop are straightforward, they let you capture video from a camera or your computer screen. Desktop+ has an extra option that lets you confine capture to a specific application. When I took the screen shot with Sonic and Melee, I had the CamTwist window overlapping the emulators and they did not appear because I confined capture to only those apps. Furthermore if you want the option to scale/move/combine sources like in the image, highlight the element you want (Desktop+ in this case) and click on PIP. Your options available appear in the bottom left section.
Once you have your sources prepared, click the button squares to highlight them, they turn green and appear in the Preview window. Nothing in the preview window is live, so it’s a great way to choose your sources with ease while running a live broadcast (in the image, you can see my timer and text overlay is being previewed, but not live). When you want it to go on air, click either Cut, Dissolve, or Effect on the right (the effect used is whatever you have chosen from the drop box below it). Everything in the Program window is on air (if you’re streaming, that is), and the buttons in use will be highlighted red. To remove them individually, click the corresponding button and it will turn orange, then click Cut, Dissolve, or Effect. You can instantly remove them all by clicking “Clear” on the bottom right.
That’s really all it takes for basic CamTwist usage. I assure you that it’s really much faster and easier to actually do all this than to explain it.
Special note about Lion: Whenever you capture Desktop+ video and switch to another desktop space, the video in CamTwist turns to a black screen. This does not happen in (Snow) Leopard, so keep it in mind for live broadcasts! Keep everything you want to monitor in the same desktop.
Flash Media Live Encoder:

This software takes your video sources, compresses them, and uploads directly to your live stream account. All settings and previews are done in one window. FMLE is the only truly essential piece of software if you want the bare minimum.
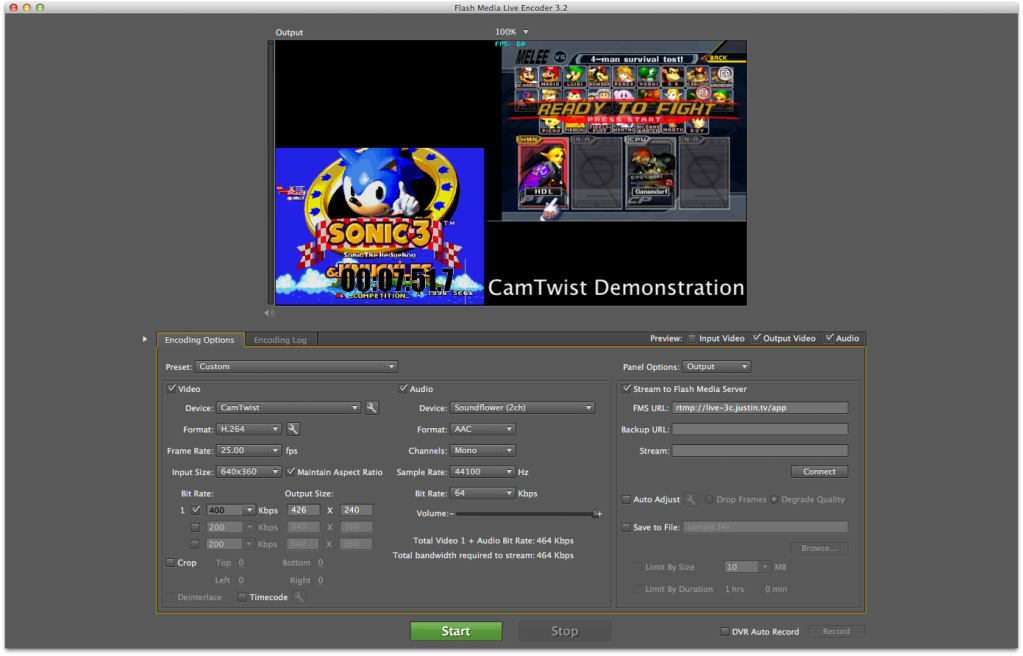
How to use: Choose your device, and you will see cameras you have connected, hardware capture devices (not all are compatible), and CamTwist. Click the wrench on the right for device options. The rest of the settings depend entirely on your Internet connection, computer specs, and what type of stream you’re trying to do.
To actually send this video to your stream account, enter the FMS URL associated with the site you use. The one in the image is for Justin/Twitch TV. Backup URL is for streaming to another site at the same time (do not do this unless you have the bandwidth for it!). Lastly, where it says “Stream” you should enter your unique stream key, which is associated with your account. Don’t share this key with anyone unless you want them to commandeer your stream. You may click Connect if you want, but it’s not necessary. When you click Start on the bottom, it will automatically connect and then show the encoding log while you’re live, which shows you on-the-fly information about your stream.
Soundflower: Audio routing utility that gives you more flexibility with audio capture and control.
Paid
Wirecast: If you’re looking for more powerful, professional features than what FMLE has to offer, you can purchase this for $449, or get the “Pro” version for $995.
Audio Hijack Pro: For just $32 you can record, mix, route, and manipulate any audio that goes in or out of your computer. Combined with Soundflower you can easily mix audio and use it for streaming by setting your audio device to Soundflower in FMLE, Wirecast, etc. I recommend clicking the “Effects” and choosing 4FX Effect -> Auxiliary Device Output, click Editor and for device choose Soundflower (2ch). Do this for every source you want to capture audio from, making it easy to send it all to your stream.